當網站加入 SSL 加密協定(HTTPS,網址列會是綠色鎖頭圖示),就不會被讀者誤會是危險網站或詐騙網站了(HTTP,是紅色鎖頭圖示)。申請方式其實很簡單,但是因為是免費的,所以每3個月需要重新申請憑證。
我覺得不會太麻煩,反正就用手機日曆功能提醒自己就好了,或者注意線上申請網站,發送的電子郵件通知信,通常會在憑證到期前一個星期會收到信件,再找個時間更新憑證就可以了!而我也是最近才搞清楚 Let’s Encrypt、SSL For Free、ZeroSSL 三者的關係,在文章中會一併說明。雖然有沒有搞清楚它們之間的關係並不影響憑證的申請,純粹是基於好奇心,才會在空閒時爬文。
Let’s Encrypt、 SSL For Free、ZeroSSL 三者的關係
簡單說,從下圖可以清楚了解 Let’s Encrypt 是憑證中心,可以透過線上工具網站( ZeroSSL、SSL For Free、 Certbot)的幫忙,完成憑證申請,然後再安裝於網站當中。整個流程都是免費的,不需要額外付費。假使是免費申請的話,憑證效期只有 90 天,在期限到之前,必須再重新申請一次憑證來使用。
原本使用S S L For Free 來完成憑證申請已經好長一段時間了,可是從 2020 年開始,想要重新申請憑證時,網站都會自動轉址到 ZeroSSL 來完成後續流程。一直也搞不懂原因,也害怕憑證出狀況無法使用,所以就花了一些時間了解什麼是 ZeroSSL。接下來可以看一下如何利用 ZeroSSL 網站,完成整個憑證申請的流程!

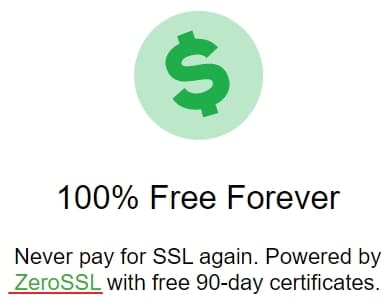
現在前往S S L For Free網站的話,可以明顯看到: Never pay for S S L again. Powered by ZeroSSL with free 90-day certificates.不難理解, ZeroSSL 網站似乎已經取代S S L For Free 網站的申請功能的原因了。
(不推薦) 只能申請 3 次免費憑證:ZeroSSL
申請憑證雖然很便利,但是最大的缺點就是一個帳號,只能對同一個網域申請3次憑證。簡單說,當你使用了9個月後,就無法再針對同一個網域申請免費憑證了。
有方法解決嗎?當然有,在文章最後一個章節會分享使用Certbot申請Let’s Encrypt憑證的方法,利用Certbot這個方法,就可以永久使用免費憑證了。
輸入要申請的網址
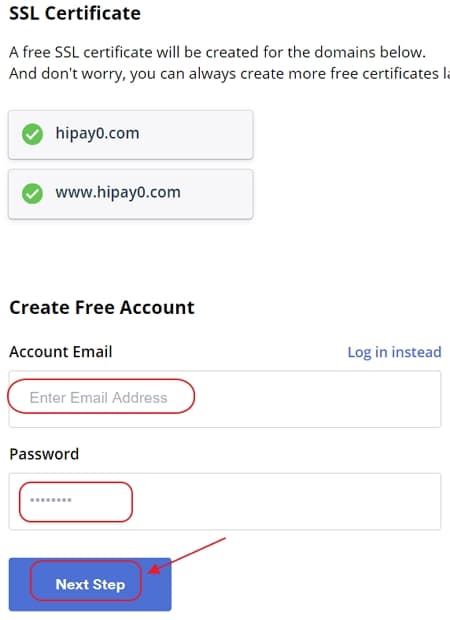
前往網站,輸入要申請憑證的網址。

建立帳號
這個帳號除了用來登入來維護所有憑證之外,還會收到未來憑證到期的提醒信件。
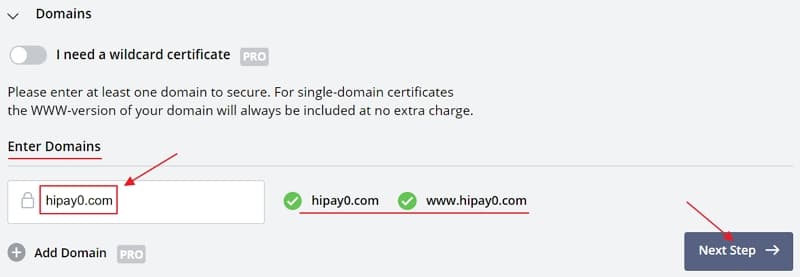
填寫網域
憑證效期: 90天(免費版)
順利的話,在這一步當中可以看到【Domains】是綠色符號,這代表前一步的流程是正確的。接著因為是免費版憑證申請的關係,所以只能選 90-Day Certificate 這個選項,然後點選下一步。

選取 Auto-Generate CSR

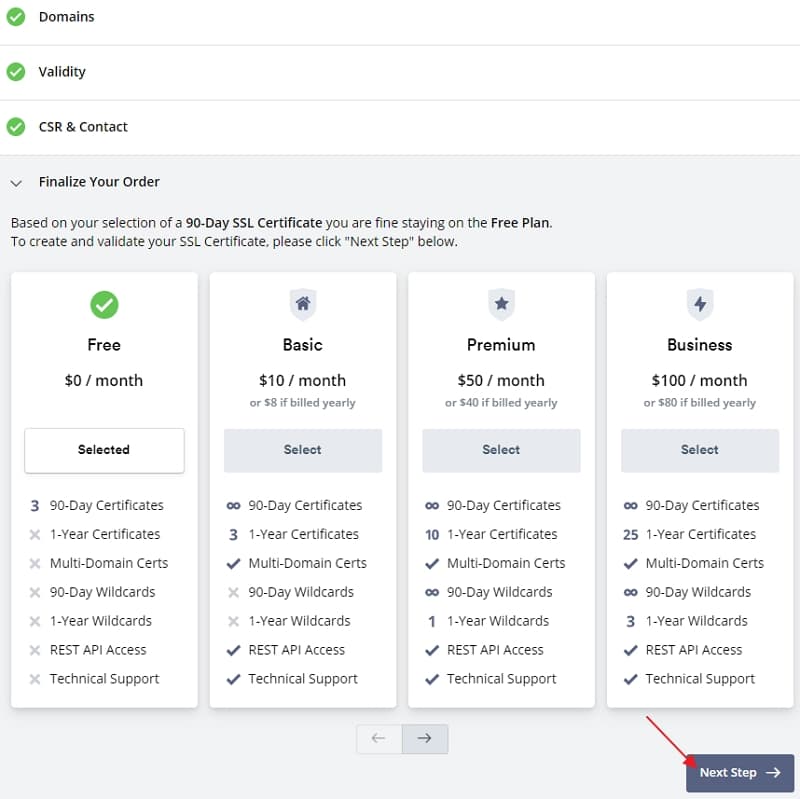
方案選擇
因為是申請免費版憑證,所以直接點選下一步。
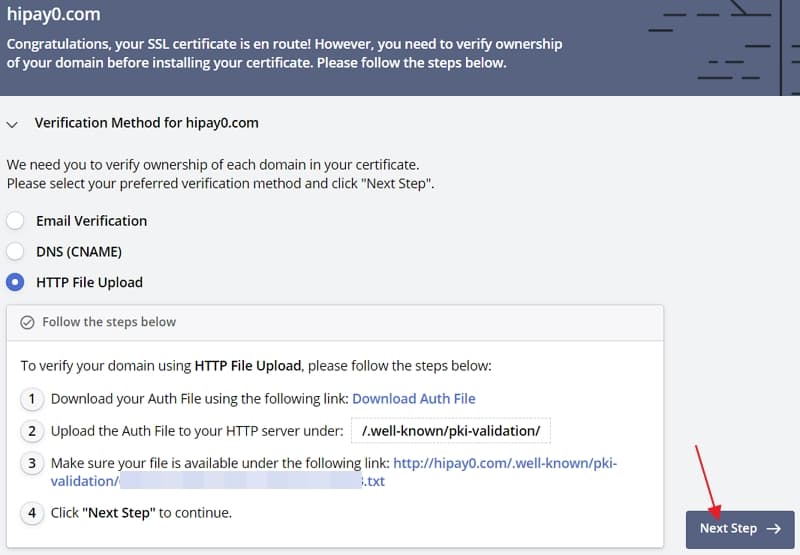
驗證網站所有權
提供了三種驗證網站所有權的方式:
- Email Verification
- DNS ( CNAME )
- HTTP File Upload
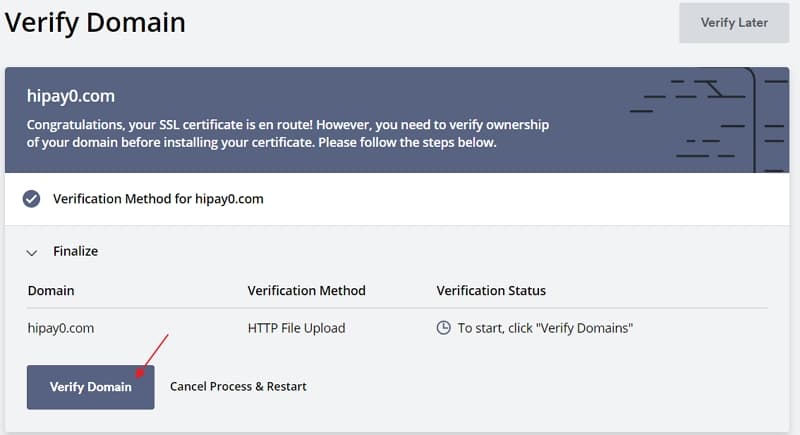
按照說明步驟,將測試檔案放在網站中,然後點選下一步即可。
下載憑證
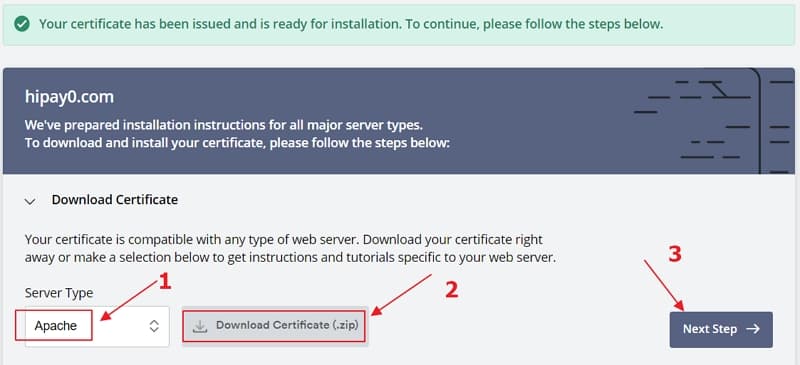
當驗證網站所有權沒問題之後,接著就是要選擇要下載的伺服器類型,然後把憑證下載到電腦中備份,最後按下一步。
安裝憑證到網站中
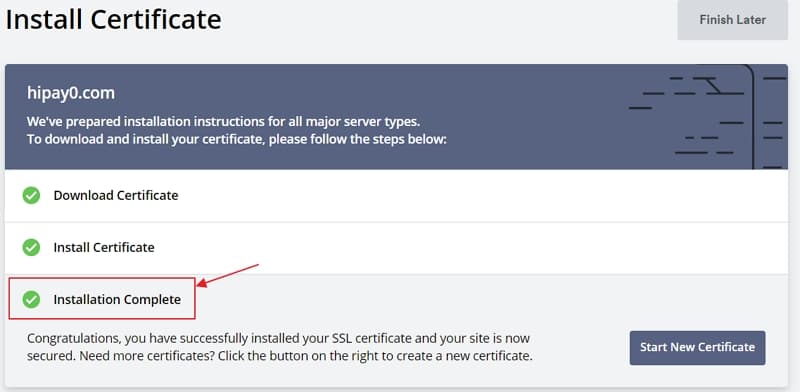
因為目前是使用 XAMPP 自架網站的關係,所以直接將剛剛下載的憑證檔案解壓縮,放在以下路徑後,開啟 XAMPP 控制面板,然後 restart Apache ,連上網站測試連線看看。假使可以正常連線的話,就完成所有憑證申請的流程了(下圖)。
- ca_bundle.crt
- 放在 C : \ xampp \ apache \ conf \s s l . c r t \
- certificate.crt
- 放在 C : \ xampp \ apache \ conf \s s l . c r t \
- private.key
- C : \ xampp \ apache \ conf \s s l . k e y \
(已停用) 免費憑證申請:SSL For Free
連結到網站
點選下方連結,進到網站後,在欄位中填入你要申請 Let’s Encrypt 憑證的網域名稱,再用空白鍵來輸入不同的網址,例如
- 申請網站: 點我
- 輸入網域名稱 (範例) : 【 hipay0.com www.hipay0.com 】
- 點選按鈕: 【 Create Free Certificate 】

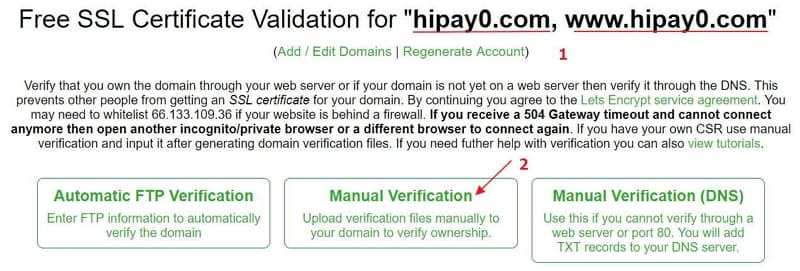
使用 Manual Verification
可以看到剛剛輸入想要申請憑證的網址會列在最上方,假使正確的話,就可以按【 Manual Verification 】
- Manual Verification
- Upload verification files manually to your domain to verify ownship
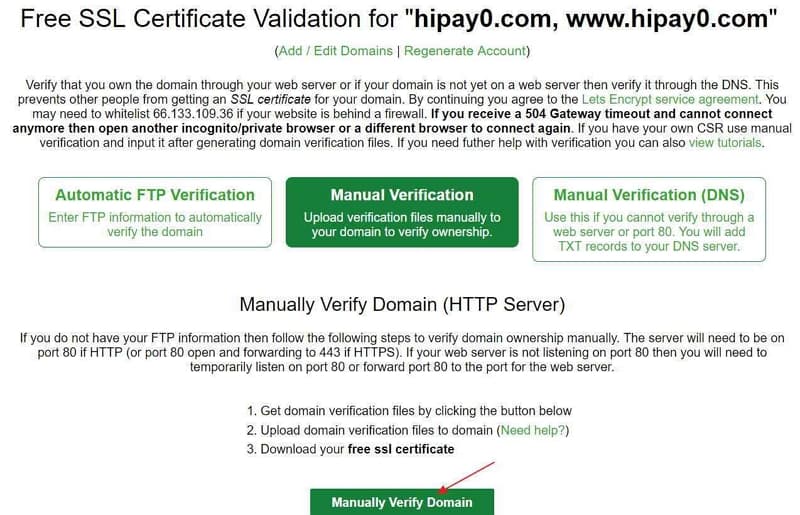
Manually Verify Domain
滑鼠往下滑動,然後按【 Manually Verify Domain 】
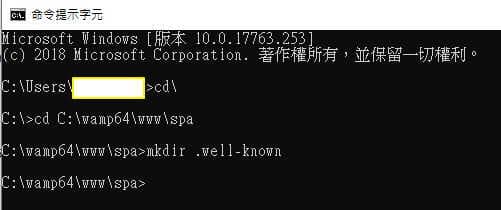
建立 .well-known 資料夾
先打開 command windows ,在安裝 WordPress 的路徑下新增【 .well-known 】資料夾:
- cd \
- cd C : \ wamp64 \ www \ spa
- mkdir .well-known
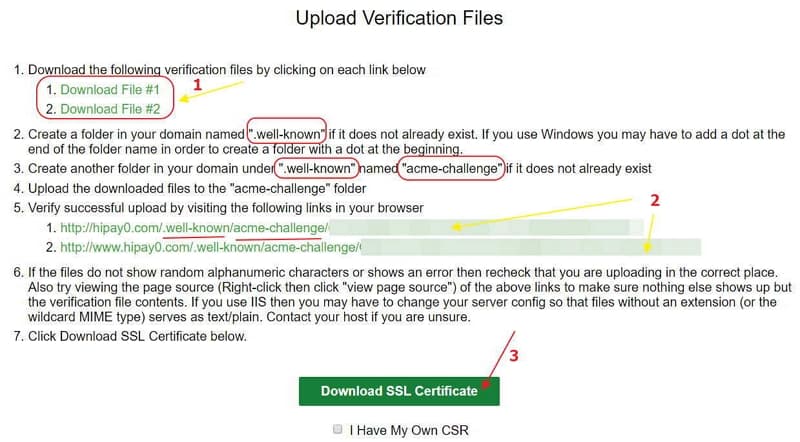
建立 acme-challenge 資料夾
然後開啟檔案總管,在 C : \ wamp64 \ www \ spa \ .well-known \ 的路徑下再新增【 acme-challenge 】資料夾

Download Certificate
在下方【 1 】的兩個檔案下載到【acme-challenge】的資料夾下,然後點選下方【 2 】兩個連結,假使能夠開啟新的網頁,而且正確顯示文字的話,就代表成功了。接著按下【 Download Certificate 】按鈕
設定通知信箱
接著會出現帳號登入的畫面,就輸入你常用的 email 信箱,這樣子,憑證到期前一周,會透過這個 email,通知你要更新憑證。
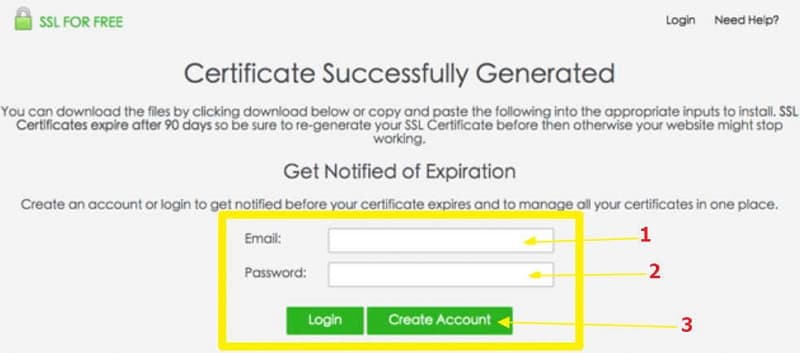
下載憑證到電腦
然後把憑證下載到電腦

解壓縮憑證檔案
解壓縮後複製到 C : \ wamp64 \ bin \ apache \ apache2.4.37 \ conf ,這樣子就完成憑證申請了。
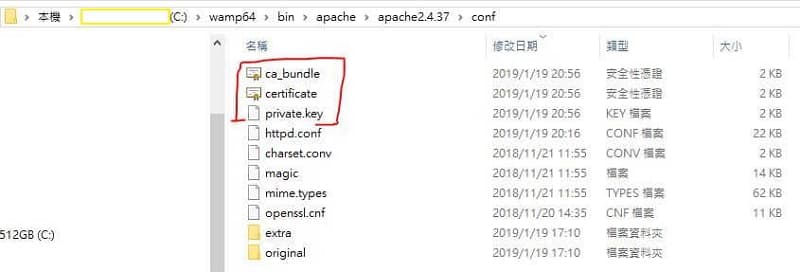
驗證網站
最後,在瀏覽器網址列輸入【 https://hipay0.com/ 】,假使可以進入登入畫面,就表示成功了!
(推薦) 申請憑證完全免費:Certbot
跟上述兩個方法相比,過程的確比較複雜一點,照著下面的流程,相信你也可以完成申請。
下載 Certbot 工具
方法 1、前往官網尋找安裝軟體:https://certbot.eff.org/instructions?ws=apache&os=windows
方法 2、直接下載檔案:https://dl.eff.org/certbot-beta-installer-win_amd64.exe
檔案名稱:certbot-beta-installer-win_amd64.exe
執行程式後會安裝在 C:\Program Files\Certbot\ 目錄底下。
確認 Certbot 是否有安裝成功
打開系統管理員身份執行開啟 Command Prompt,然後輸入以下指令:
C:\Windows\system32>cd C:\Program Files\Certbot\bin\
C:\Program Files\Certbot>certbot –-version
certbot 2.9.0
C:\Program Files\Certbot>certbot -h
certbot [SUBCOMMAND] [options] [-d DOMAIN] [-d DOMAIN] …
.
-h all print a detailed help page including all topics
–version print the version number
建立憑證
以我的 hipay0.com 網域名稱為範例,輸入以下命令同時產生 hipay0.com 網域憑證與 *.hipay0.com 萬用子網域憑證。
C:\Program Files\Certbot>certbot certonly –manual -m YOUREMAIL@gmail.com -d hipay0.com -d *.hipay0.com
假使輸入以上指令後,過程中沒有出現
– Step 1 提供的範例:【Please deploy a DNS TXT record under the name:…】或
– Step 2 提供的範例:【Create a file containing just this data:…】
請直接跳到 Step 3 改用另一個指令完成驗證程序。
Step 1:DNS TXT record (適用於:單一域名或萬用域名)
Please deploy a DNS TXT record under the name:
_acme-challenge.hipay0.com
with the following value:
18tsdddssss_DH1dddd
Before continuing, verify the TXT record has been deployed. Depending on the DNS
provider, this may take some time, from a few seconds to multiple minutes. You can
check if it has finished deploying with aid of online tools, such as the Google
Admin Toolbox: https://toolbox.googleapps.com/apps/dig/#TXT/_acme-challenge.hipay0.com
Look for one or more bolded line(s) below the line ‘;ANSWER’. It should show the
value(s) you’ve just added.
Press Enter to Continue
先不用急著按任意鍵!!!
前往 DNS provider (我的例子:cloudflare)更改
Type:TXT
Name:_acme-challenge
TTL:Auto
Content:18tsdddssss_DH1dddd
更新完之後,前往 https://toolbox.googleapps.com/apps/dig/#TXT/_acme-challenge.hipay0.com 確認一下 Content 是否正確。沒問題後,可以按下任意鍵。
Step 2:新增檔案 (適用於:單一域名)
Create a file containing just this data:
81ffffggggg.2iFsssssssse0
And make it available on your web server at this URL:
https://hipay0.com/.well-known/acme-challenge/81ROsH0sDw1F8MapbmV7tqmEB_uFE2c1MTgZ0q6oD-4
(This must be set up in addition to the previous challenges; do not remove, replace, or undo the previous challenge tasks yet.)
接下來在 \xampp\htdocs\ 新增 .well-known 資料夾
指令:mkdir .well-known
在 .well-known 資料夾底下新增 acme-challenge 資料夾
\htdocs\.well-known\acme-challenge
新增一個沒有副檔名的檔案,
– 檔名是:81ffffggggg
– 檔案內容是:81ffffggggg.2iFsssssssse0
確認連結是否可以正常連線:
https://hipay0.com/.well-known/acme-challenge/81ffffggggg
然後,就準備發出憑證請求了。
按下【Enter】,開始申請憑證。
Requesting a certificate for hipay0.com and *.hipay0.com
Step 3:DNS TXT record (適用於:單一域名或萬用域名)
輸入以下指令,取得 DNS TXT record 資料後,再根據 Step 1 的說明完成驗證流程。
參數說明:
1. certonly:只產生憑證,讓 Certbot 不要自動產生或修改網頁伺服器的設定檔案。
2. certbot certonly:半自動驗證(自備 HTTP 伺服器,不調整網頁伺服器設定)
3. –server:指定 CA server。Certbot 預設的 Let’s Encrypt’s production server 是 https://acme-v02.api.letsencrypt.org/directory。(來源資料:Changing the ACME Server)
4. –manual:使用手動驗證。
5. –preferred-challenges dns:使用 DNS 的方式完成驗證 challenge,所以 Step 2 可以直接略過。
6. -d:指定網域名稱,例如:hipay0.com
7. –dry-run:測試用途,一旦驗證流程完全正確後,務必把這個參數刪除再重新執行一次 Step 3。因為 Certbot 規定,同一網域驗證過程失敗 5 次後,會封鎖用戶繼續使用 Certbot。需要等待 1 小時後,才會開放用戶繼續使用 Certbot。(來源資料:Rate Limits – Let’s Encrypt)
C:\Program Files\Certbot\bin>certbot certonly –server https://acme-v02.api.letsencrypt.org/directory –manual –preferred-challenges dns -d hipay0.com –dry-run
Saving debug log to C:\Certbot\log\letsencrypt.log
Simulating a certificate request for hipay0.com
Please deploy a DNS TXT record under the name:
_acme-challenge.hipay0.com.
with the following value:
9y2DP9EIumOjmkWyV8fx1cORCVEXXI2KdRjTccRhf2o
Before continuing, verify the TXT record has been deployed. Depending on the DNS
provider, this may take some time, from a few seconds to multiple minutes. You can
check if it has finished deploying with aid of online tools, such as the Google
Admin Toolbox: https://toolbox.googleapps.com/apps/dig/#TXT/_acme-challenge.hipay0.com.
Look for one or more bolded line(s) below the line ‘;ANSWER’. It should show the
value(s) you’ve just added.
Press Enter to Continue
The dry run was successful.
2024-7-22: 申請憑證範例
C:>cd C:\Program Files\Certbot\bin
C:\Program Files\Certbot\bin>certbot –version
certbot 2.9.0
C:\Program Files\Certbot\bin>certbot certonly –manual -m YOUREMAIL@gmail.com -d hipay0.com
Saving debug log to C:\Certbot\log\letsencrypt.log
Requesting a certificate for hipay0.com
Create a file containing just this data:
c1X2JJfd-wsMuKxabq65otk_DdfK0feQWCrb9bCIM0.245d12uE2o2HqyuI8oMr1ZBC-vs4Nx1FgbEgOQFkX
And make it available on your web server at this URL:
https://hipay0.com/.well-known/acme-challenge/c1X2JJfd-wsMuKxabq65otk_DdfK0feQWCrb9bCIM0
Press Enter to Continue
Successfully received certificate.
Certificate is saved at: C:\Certbot\live\hipay0.com\fullchain.pem
Key is saved at: C:\Certbot\live\hipay0.com\privkey.pem
This certificate expires on 2024-10-20.
These files will be updated when the certificate renews.
補充說明:兩種認證流程
申請 Let’s Encrypt 免費憑證,只需要選擇以下一種認證流程就好了。
1、單一域名:hipay0.com
2、萬用域名:*.hipay0.com
1、單一域名
開放 Port 80 讓 Let’s Encrypt 進行 HTTP 連線存取你的網址!
認證方式:
– 在網站根目錄 Z:\htdocs\,新增【.well-known】的資料夾
– 在【.well-known】資料夾底下,再新增【acme-challenge】資料夾
– 新增無副檔名的檔案,檔名是【5mxxxFw】,檔案內容是【5mxxxFw.i5yyyC0】
Create a file containing just this data:
5mxxxFw.i5yyyC0
And make it available on your web server at this URL:
http://hipay0.com/.well-known/acme-challenge/5mxxxFw
2、萬用域名
前往 DNS 服務商,新增一筆 TXT 紀錄到 _acme-challenge.hipay0.com 的域名上,並將其值設定為 Certbot 需要驗證的指定值。
認證方式:
前往 Cloudflare 新增一筆 TXT 紀錄到 _acme-challenge.hipay0.com 的域名上,並將其值設定為 iqzzzNZ-_USmmmUk,就完成了。
Please deploy a DNS TXT record under the name:
_acme-challenge.hipay0.com.
with the following value:
iqzzzNZ-_USmmmUk
Before continuing, verify the TXT record has been deployed… You can
check if it has finished deploying with aid of online tools, such as the Google
Admin Toolbox: https://toolbox.googleapps.com/apps/dig/#TXT/_acme-challenge.hipay0.com.
…
完成 Let’s Encrypt 憑證申請
當你看到以下文字,表示憑證已經建立完成了,可以前往路徑下,把憑證放在網站相對應的資料夾裡面。
Successfully received certificate.
Certificate is saved at: C:\Certbot\live\hipay0.com\fullchain.pem
Key is saved at: C:\Certbot\live\hipay0.com\privkey.pem
This certificate expires on 2022-01-21.
These files will be updated when the certificate renews.
NEXT STEPS:
– This certificate will not be renewed automatically. Autorenewal of –manual certificates requires the use of an authentication hook script (–manual-auth-hook) but one was not provided. To renew this certificate, repeat this same certbot command before the certificate’s expiry date.
– – – – – – – – – – – – – – – – – – – – – – – – – – – – – – – – – – – – – – – –
If you like Certbot, please consider supporting our work by:
* Donating to ISRG / Let’s Encrypt: https://letsencrypt.org/donate
* Donating to EFF: https://eff.org/donate-le
– – – – – – – – – – – – – – – – – – – – – – – – – – – – – – – – – – – – – – – –
修改 h t t p d – s s l . c o n f
最後一步,照著下面的路徑,把相對應的憑證放到對的資料夾,然後也要修改 httpd-ssl.conf 這個檔案。清除快取,重開 Apache,打開網站假使有看到綠色鎖頭,就表示全部流程都完成了。
打開設定檔: \conf\extra\httpd-ssl.conf
將 Line 149 改成: S S L CertificateFile “C:/xampp/apache/conf/ s s l . c r t /cert.pem”
將 Line 169 改成: S S L CertificateChainFile “C:/xampp/apache/conf/ s s l . c r t /chain.pem”
將 Line 180 改成: S S L CACertificateFile “C:/xampp/apache/conf/ s s l . c r t /fullchain.pem”
將 Line 159 改成: S S L CertificateKeyFile “C:/xampp/apache/conf/ s s l . k e y /privkey.pem”
Windows 10 自架網站流程
只要照著我的步驟做,相信你也可以不用額外花半毛錢,就可以在 Windows 10 的電腦上面,架設好屬於自己的專屬網站了(這篇文章可以看到自架網站的完整敘述)。而這系列的分享文章,是寫給架站新手 / 小公司 / 部落客的,不適用於大型企業 / 大神級…
架站工具
商標設計
Logo Design
架站效能
架站安全
網頁標題
網頁標題
廣告違規
你可能有興趣: 你知道個人網站也是需要製作 logo 的原因嗎?
常見問題
透過 ZeroSSL 網站申請憑證的話,需要安裝其他程式嗎?
不用。無須下載或安裝任何外掛程式,只需要透過瀏覽器,在網站中填入相關資訊,照著憑證產生精靈的步驟做即可或取憑證。
ZeroSSL 申請憑證有次數限制嗎
有,無法無限次數續用。
為什麼免費版憑證只有 90 天的有效期限呢?
跟密鑰洩露和誤發行有關係,假使發生錯誤或被盜的話,可以在較短的時間內發現、解決。
只能透過 ZeroSSL or SSL For Free 來申請憑證嗎?
幾個常見的網站都提供憑證申請:
1. Let’s Encrypt: https://letsencrypt.org/
2. Certbot: https://certbot.eff.org/
3. WoSign’s KuaiSSL: 網站似乎有問題,無法連線
4. Free S S L Certificate: https://www.freesslcertificate.org/
免費版憑證,只能考慮使用 Let’s Encrypt 嗎?
可以有其它選擇,例如: The better option is provided by Cloudflare.
Cloudflare 不僅只是 CDN service provider,也提供免費版的憑證讓 CDN 用戶使用。
如何快速找到惡意爬蟲的IP?
憑證的確是提高網站資安的方法之一,但是分析 Apache log 找出惡意連線 IP,也是另一個需要執行的一件事。分享兩個免費方法,讓你輕鬆又快速分析 log,揪出惡意連線的 IP 。
結論:強烈建議使用 Certbot 申請 Let’s Encrypt 免費 SSL 憑證
想要完全免費使用憑證的話,建議採取【Certbot】的方式,才能不限次數使用免費的憑證。或許您也可以使用第三方服務 Qualys SSL Labs 提供的檢查程式來檢測網站的 HTTPS 配置和評分級別。


