在 Windows 11 獨立安裝 Apache、MySQL、PHP 與 phpMyAdmin 好處:
對 WordPress 網站有完整控制權,根據需求做客製化調整,獲得網站性能提高的好處;
即時更新軟體防止漏洞,增強安全性;
不需依賴懶人包(例如:XAMPP),減少相容性問題與更新周期太長的缺點;
不需要撰寫或修改程式。
事前作業,請先自行下載以下軟體:
1、Microsoft Visual C++ Redistributable for Visual Studio 2022
2、Apache Lounge Webmasters
3、PHP (Windows downloads >> VS16 x64 Thread Safe)
4、phpMyAdmin
5、MySQL
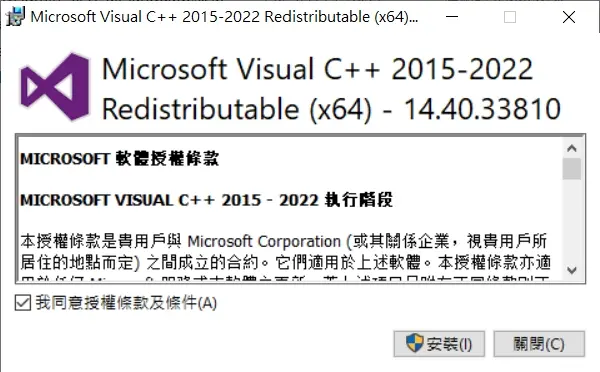
安裝 Microsoft Visual C++ Redistributable
直接執行安裝檔就可以完成安裝。
安裝 Apache 網頁伺服器軟體
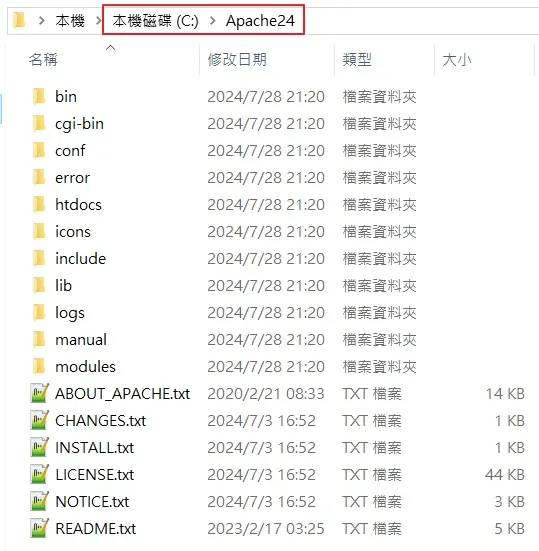
解壓縮 Apache Lounge Webmasters
1、解壓縮從 Apache Lounge Webmasters下載的檔案(例如:httpd-2.4.61-240703-win64-VS17.zip)
2、將 Apache24 整個資料夾複製到C槽
安裝 Apache24
1、用【系統管理員身分】開啟【命令提示字元】
2、切換路徑到:cd C:\Apache24\bin\
3、執行安裝指令:httpd.exe -k install -n “Apache24”
4、看到以下安裝紀錄,表示安裝成功!
Installing the ‘Apache24’ service
The ‘Apache24’ service is successfully installed.
Testing httpd.conf….
Errors reported here must be corrected before the service can be started.
httpd 常見的指令有:
Removing an Apache service
httpd.exe -k uninstall
The specific Apache service to be uninstalled
httpd.exe -k uninstall -n “Apache24”
To stop an Apache service
httpd.exe -k stop -n “Apache24”
To restart an Apache service
httpd.exe -k restart -n “Apache24”
參考來源:Apache 安裝指令
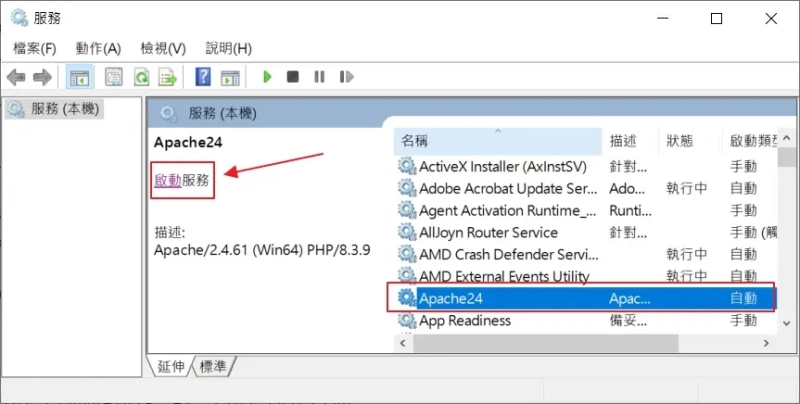
啟動 Apache24 服務
在 Windows 11 搜尋列中,輸入【Service】,找到【Apache24】之後,按下【啟動】。
安裝 PHP
1、解壓縮從網站下載的檔案
2、資料夾名稱更改成【php】
3、整個資料夾複製到C槽
4、將【php.ini-development】更改名稱為【php.ini】

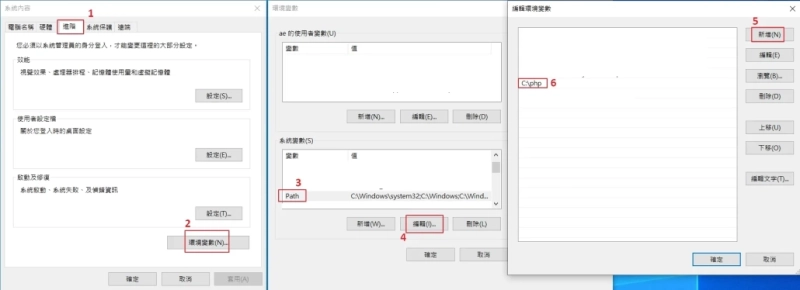
5、在 Windows 11 搜尋列中,輸入【環境變數】,在【Path】下新增【C:\php】。
6、確認是否有安裝成功,用【系統管理員身分】開啟【命令提示字元】,輸入下圖指令,假使看到以下資訊,表示安裝成功!

7、將檔案連結到 Apache24,新增以下指令到【C:\Apache24\conf\httpd.conf】

安裝 MySQL
1、執行 MySQL 安裝檔(例如:mysql-installer-community-8.0.38.0.msi)
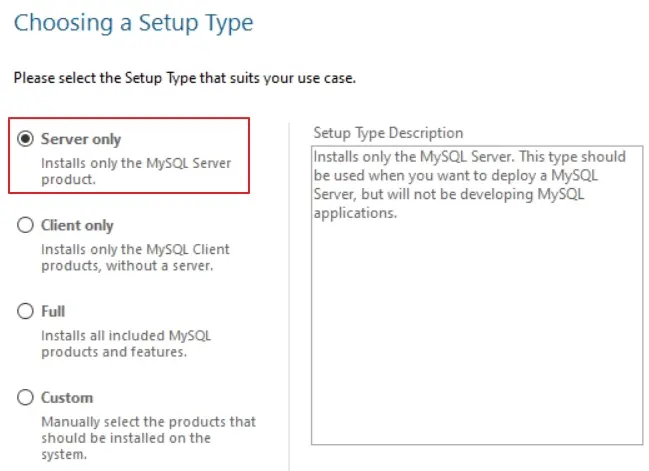
2、在 Choosing a Setup Type 中,選擇【Server only】
3、Authentication Method :選擇【Use Strong Password Encryption for Authentication (RECOMMENDED)】
4、Account and Roles:在【MySQL User Accounts】按下【Add User】然後輸入登入 MySQL 的帳號與密碼
5、安裝過程的其餘部分都使用預設值
6、檢查是否安裝成功,在下面路徑輸入指令【mysql.exe -u root -p】
Microsoft Windows [版本 10.0.19045.4651]
(c) Microsoft Corporation. 著作權所有,並保留一切權利。
C:\Windows\system32>cd C:\Program Files\MySQL\MySQL Server 8.0\bin
C:\Program Files\MySQL\MySQL Server 8.0\bin>mysql.exe -u root -p
Enter password: xxxxxxxxx
Welcome to the MySQL monitor. Commands end with ; or \g.
Your MySQL connection id is 11
Server version: 8.0.38 MySQL Community Server – GPL
Copyright (c) 2000, 2024, Oracle and/or its affiliates.
Oracle is a registered trademark of Oracle Corporation and/or its
affiliates. Other names may be trademarks of their respective owners.
Type ‘help;’ or ‘\h’ for help. Type ‘\c’ to clear the current input statement.
mysql>
安裝 phpMyAdmin
1、解壓縮從網站下載的檔案
2、將資料夾名稱更改成【p-h-p-myadmin】,資料夾名稱可任意更改
3、將整個資料夾複製到【C:\Apache24\htdocs\】
4、將【config.sample.inc.php】更改名稱為【config.inc.php】

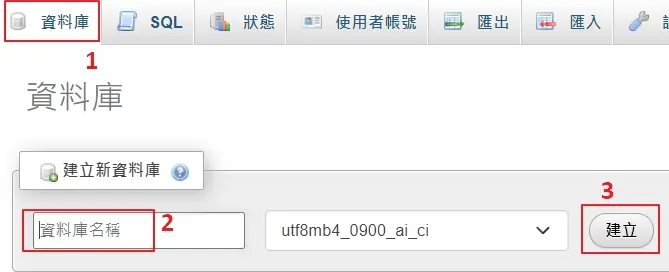
5、新增資料庫:在瀏覽器輸入網址【https://hipay0.com/p-h-p-myadmin/】,用剛剛在 MySQL 建立的使用者帳號登入,而這個資料庫會給 WordPress 使用。
安裝 WordPress
1、解壓縮從 WordPress 網站下載的檔案(例如:wordpress-6.6.1-zh_TW.zip)
2、將整個資料夾複製到【C:\Apache24\htdocs\】
3、在瀏覽器輸入網址【https://hipay0.com/】,開始安裝 WordPress
常見問題
Q1、實用的 WordPress 程式碼有哪些?
A1:在【C:\Apache24\htdocs\wp-config.php】檔案中,新增以下程式碼。
/* 禁用WordPress文章版本(Post Revisions)功能 */
define( ‘WP_POST_REVISIONS’, false );
/* 清空回收桶 */
define (‘EMPTY_TRASH_DAYS’, 7);
/* 關閉後台佈景編輯功能 */
define(‘DISALLOW_FILE_EDIT’, true);
/* 設定自動儲存時間設定為一天 */
define( ‘AUTOSAVE_INTERVAL’, 86400 );
Q2、如何新增 robot.txt
A2:在【C:\Apache24\htdocs\】路徑下,新增 robot.txt。
robots.txt 的主要功用是讓搜尋引擎是否可以爬取網站資料?當網站上加入 robots.txt 這個檔案,基本上,搜尋引擎(例:Google 搜尋引擎),就會按照規定爬取網站的資料。
參考文章:如何編寫及提交 robots.txt 檔案
Q3、更改 httpd.conf 設定
A3:在【C:\Apache24\conf\httpd.conf】檔案中,更改或新增以下內容。
# 啟動 Gzip 網頁壓縮,將預設內容的【#】去掉
LoadModule deflate_module modules/mod_deflate.so
LoadModule filter_module modules/mod_filter.so
LoadModule headers_module modules/mod_headers.so
#解決 Leverage browser caching 的方法,將預設內容的【#】去掉
LoadModule expires_module modules/mod_expires.so
# Enable http/2,將預設內容的【#】去掉
LoadModule http2_module modules/mod_http2.so
# Enable Brotli Compression in Apache,將預設內容的【#】去掉
LoadModule brotli_module modules/mod_brotli.so
# Enable Group authorizations based on host (name or IP address),將預設內容的【#】去掉
LoadModule access_compat_module modules/mod_access_compat.so
# 將預設內容的【#】去掉
LoadModule dav_lock_module modules/mod_dav_lock.so
LoadModule rewrite_module modules/mod_rewrite.so
LoadModule ssl_module modules/mod_ssl.so
LoadModule socache_shmcb_module modules/mod_socache_shmcb.so
LoadModule version_module modules/mod_version.so
Include conf/extra/httpd-mpm.conf
Include conf/extra/httpd-vhosts.conf
Include conf/extra/httpd-default.conf
Include conf/extra/httpd-ssl.conf
# Sample Cache Configuration
LoadModule cache_module modules/mod_cache.so
LoadModule cache_disk_module modules/mod_cache_disk.so
<IfModule mod_cache.c>
<IfModule mod_cache_disk.c>
CacheRoot “c:/cacheroot”
CacheEnable disk “/”
CacheDirLevels 5
CacheDirLength 3
CacheMaxFileSize 1000000
CacheMinFileSize 1
</IfModule>
# When acting as a proxy, don’t cache the list of security updates
CacheDisable “http://security.update.server/update-list/”
</IfModule>
# 將 “AllowOverride None” 更改成 “AllowOverride All“
Q4、更改 httpd-mpm.conf 設定
A4:在【C:\Apache24\conf\extra\httpd-mpm.conf】檔案中,更改以下內容。
# WinNT MPM
# ThreadsPerChild: constant number of worker threads in the server process
# MaxConnectionsPerChild: maximum number of connections a server process serves
<IfModule mpm_winnt_module>
ThreadsPerChild 800
MaxConnectionsPerChild 80000
</IfModule>
# The maximum number of free Kbytes that every allocator is allowed
# to hold without calling free(). In threaded MPMs, every thread has its own
# allocator. When not set, or when set to zero, the threshold will be set to
# unlimited.
<IfModule !mpm_netware_module>
MaxMemFree 4096
</IfModule>
Q5、更改 httpd-default.conf 設定
A5:在【C:\Apache24\conf\extra\httpd-default.conf】檔案中,更改以下內容。
KeepAliveTimeout 15
Q6、如何啟動 http/2
A6:在【C:\Apache24\conf\extra\httpd-ssl.conf】檔案中,更改或新增以下內容。
1). 在 SSLEngine on 下方,加上:Protocols h2 http/1.1
2). 將 SSLProtocol all -SSLv3 這一行,改成:SSLProtocol all -SSLv3 -TLSv1 -TLSv1.1
Q7、 SSL 憑證如何申請?存放路徑在哪?
A7:
1). SSL 憑證申請請參考:SSL For Free: 使用Let’s Encrypt 申請SSL憑證
2). SSL 憑證存放路徑請打開【C:\Apache24\conf\extra\httpd-ssl.conf】,更改以下內容。
SSLCertificateFile “${SRVROOT}/conf/ssl.crt/cert.pem”
SSLCertificateChainFile “${SRVROOT}/conf/ssl.crt/chain.pem”
SSLCertificateKeyFile “${SRVROOT}/conf/ssl.key/privkey.pem”
Q8、更改 php.ini
A8:把【;】刪除並更改以下內容。
# 啟動 opcache
zend_extension=opcache
opcache.enable=1
opcache.enable_cli=1
opcache.memory_consumption=256
opcache.interned_strings_buffer=8
opcache.max_accelerated_files=10000
opcache.use_cwd=1
opcache.validate_timestamps=0
opcache.revalidate_freq=60
opcache.fast_shutdown = 1
opcache.max_file_size=0
延伸閱讀
架站工具
商標設計
Logo Design
申請網域
申請網域
架站效能
架站安全
網頁標題
網頁標題
廣告違規
自架網站心得
| 一鍵完成架站懶人包 | 獨立安裝架站軟體 | |
|---|---|---|
| 適合對象 | 門檻低, 適合大眾 | 門檻稍高, 願意花時間學習 |
| 優點 | 網站可快速上線, 討論文章多 | 軟體版本更新頻繁, 防止網站存在漏洞 |
| 缺點 | 懶人包存在無團隊 繼續維護的風險 | 軟體間的相容性問題, 需要靠自己找解決方法 |


